How to Fillet a Fish Like Sportfishing Legends Ed & Frank Murray
Knowing how to fillet a fish is a rite of passage for any serious angler. It's the final, crucial step that takes your catch from a hard-won trophy to a fantastic meal on the table. For sportfishing legends Ed and Frank Murray, this isn't just about butchery; it’s about making precise, confident cuts honed over decades of competing in high-stakes saltwater tournaments, ensuring none of their effort goes to waste.
The Art of the Fillet: A Legacy of Respect
Before your knife ever touches the fish, it helps to adopt the right mindset. Filleting is the final act of respect you show the animal. For legends like Ed and Frank Murray, a lifetime of chasing giant fish from the Bahamas to the coast of Africa taught them that a perfect fillet is more than just meat. It’s about honoring the fish and maximizing the reward of a long day on the water.
This philosophy is what separates a routine chore from a respected skill. The Murray brothers built their process on the efficiency and precision demanded by the competitive sportfishing world, leaving nothing behind. It's a mindset that values the entire journey, from the moment a marlin strikes to the moment a wahoo hits the dinner plate.
A Technique Cut from Tournament Experience
The Murray Brothers' approach wasn't dreamed up in a kitchen. It was forged on the rolling decks of sportfishing boats during grueling tournaments, often miles from shore, where every second and every ounce of fish counts. That need for speed and accuracy created a filleting technique that is both incredibly clean and brutally effective.
This is why their method is so reliable—it was born from the high-pressure environment of competitive saltwater fishing. You can dive deeper into the connection between old-school angling traditions and today's techniques by reading about the history of sportfishing and how pioneers like the Murrays have shaped the sport.
“A clean fillet is the last handshake between an angler and their catch. It’s a sign of respect for the fish and a commitment to not wasting the resource.”
From Tradition to Modern Practice
While the core principles of filleting are timeless, the practice has certainly evolved. As global aquatic production skyrocketed from around 28 million tonnes in 1961 to over 162 million tonnes in 2021, processing methods had to modernize to keep up. This massive industry shift put a premium on efficient filleting to meet consumer demand for boneless, ready-to-cook portions, with production projected to hit 212 million tonnes by 2034.
The Murray method, however, keeps things grounded in that personal connection between the angler and the catch. It’s a powerful reminder that whether you're cleaning one fish or a whole cooler full, the goal is always the same: handle it with the skill and appreciation of a seasoned sportfisherman to get the best possible result. This guide will walk you through that time-honored process.
Choosing the Right Filleting Tools
A legendary angler never blames their tools—because they know better than to start with the wrong ones. After years on the saltwater sportfishing tournament circuit, Ed and Frank Murray can tell you that the right gear isn't a luxury. It's an absolute necessity for safety, efficiency, and getting that perfect cut every time.
Forget a simple checklist. This is about assembling a filleting kit that performs when you're tired, the boat's rocking, and you have a cooler full of tournament-winning fish to get through.
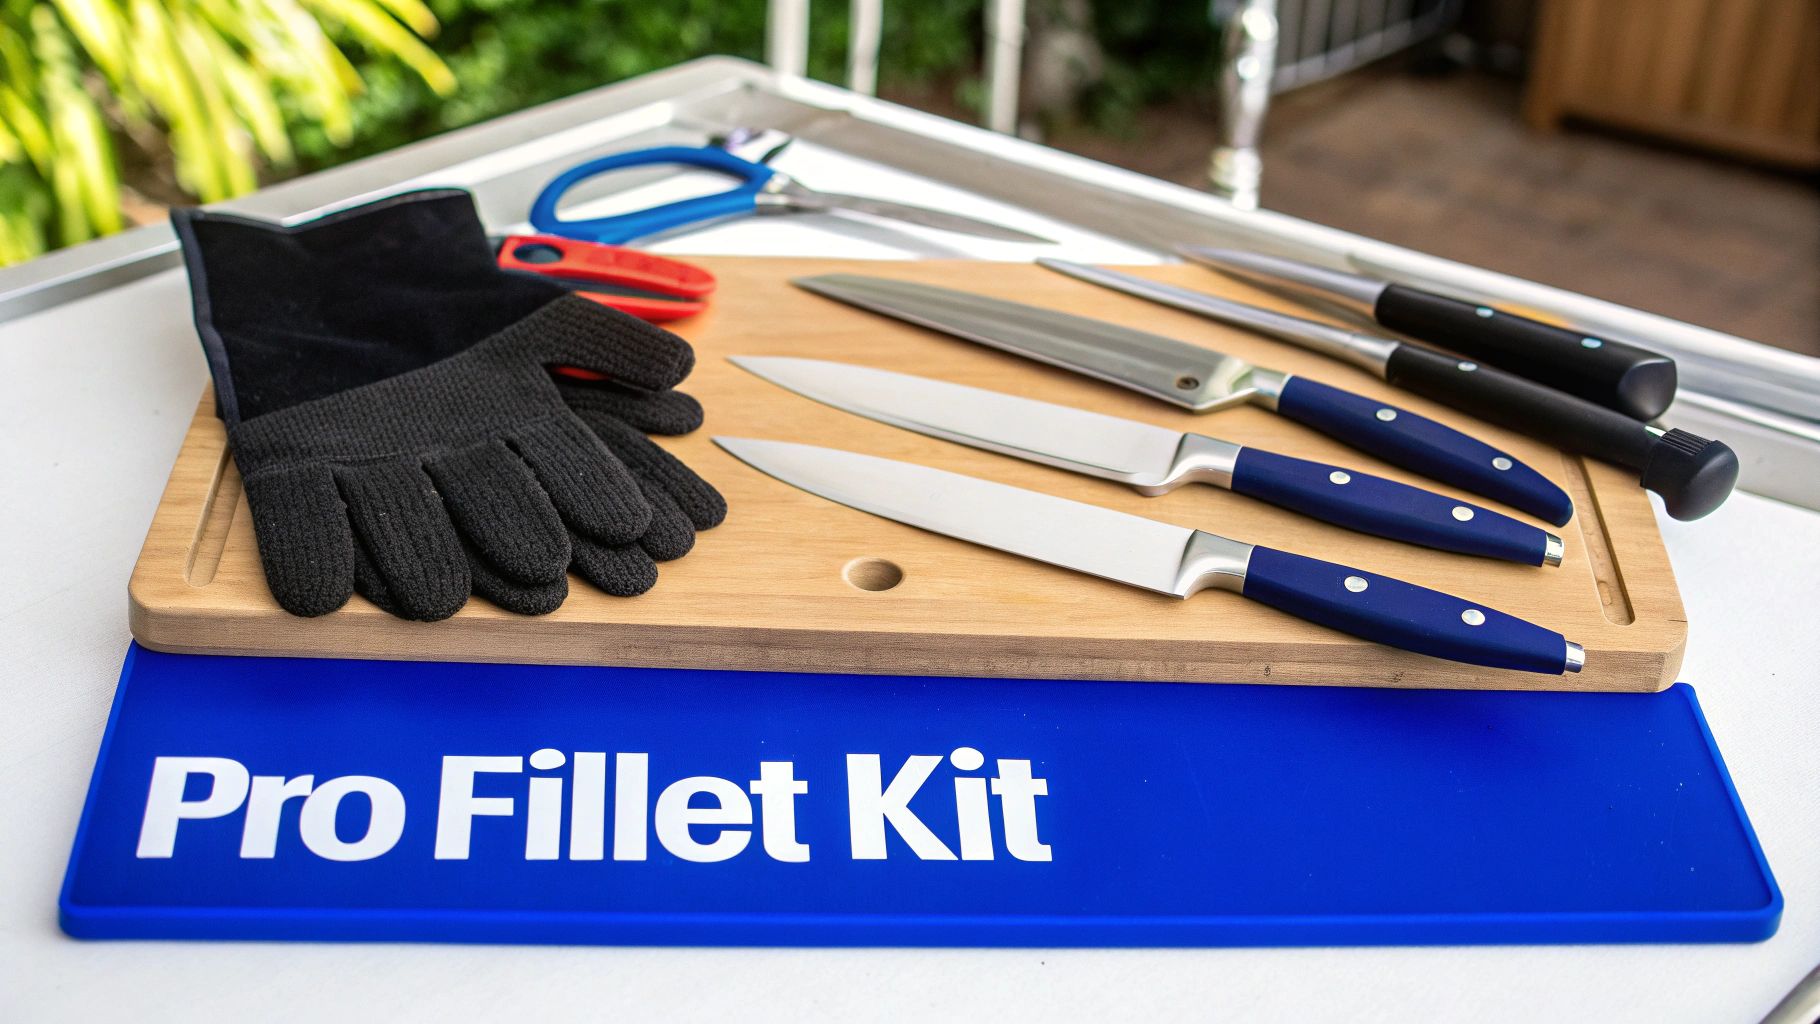
The heart of any filleting setup is the knife, no question. But not all fillet knives are built the same, and using the wrong one is like trying to win a marlin tournament with a freshwater rod. Your choice of blade flexibility, length, and even the handle material will make or break your success at the cleaning table.
Selecting the Perfect Fillet Knife
The anatomy of your catch should always dictate the knife you pull out. A blade that works wonders on a delicate snapper will just make a mess of a thick-sided wahoo.
-
Blade Flexibility: For smaller, bonier fish like flounder or mangrove snapper, you want a thin, highly flexible blade. This lets you bend and glide the knife right along the bone structure, so you leave almost no meat behind. But for big-bodied saltwater species like grouper or mahi-mahi, a stiffer, less flexible blade gives you the backbone you need to power through thick flesh without the blade buckling on you.
-
Blade Length: A good rule of thumb is to match the blade length to the fish's width. A 6-inch blade is a great all-around choice for panfish. The real workhorse for most common saltwater species, though, is a 7- to 9-inch blade. When you get into giants like tuna or swordfish, you'll need to step up to a longer, more beastly blade, often called a cimeter or breaking knife.
-
Grip Material: The handle is your only connection to that sharp blade, so a secure grip is non-negotiable, especially when your hands are wet and slimy from a long day of fishing. Look for modern rubberized or composite grips that give you excellent traction. Traditional wood handles might look classic, but they get slippery and can harbor bacteria if you don't stay on top of maintenance.
“Your knife is an extension of your hand. It should feel balanced, secure, and ready to work. If you have to fight your tool, you’ve already lost half the battle.”
Choosing your filleting tools is as foundational as picking the right rod and reel. For those just gearing up, understanding how to select core equipment is critical. Check out this guide on the best fishing gear for beginners to build a solid foundation for all your adventures.
Beyond the Blade: Essential Filleting Accessories
While the knife gets all the glory, a few other pieces of gear are just as vital for a clean, safe filleting process. Think of it as your support crew, essential for any serious sportfishing operation.
The Cutting Board
A flimsy, porous cutting board is a recipe for disaster. You need a heavy-duty, non-porous board, preferably made from high-density polyethylene. These won't absorb fishy oils or bacteria, are a breeze to sanitize, and provide a stable surface that won’t dull your knife like glass or stone will. Many even have grooves around the edge to catch the mess, keeping your workspace a lot cleaner.
Safety and Precision Tools
Your setup isn't really complete without these three items:
- Cut-Resistant Glove: Don't even think about starting without one on your non-knife hand. A fillet glove gives you a much better grip on a slippery fish and, more importantly, offers critical protection against a slip of the blade. One mistake can end a fishing trip in a hurry.
- Needle-Nose Pliers: You'll find these are indispensable for yanking out those stubborn pin bones from fillets. They're also perfect for pulling a hook before you even start cleaning the fish.
- Knife Sharpener: A dull knife is a dangerous knife. It forces you to use more pressure, which is when accidents happen. Keep a sharpening steel or a simple multi-stage sharpener in your kit and give your blade a quick touch-up before every session. A razor-sharp edge makes your cuts more precise and a whole lot safer.
Building this pro-level filleting kit is the first real step in mastering how to fillet a fish. With these tools in hand, you're not just prepared—you're set up for success, ready to honor your catch with the clean, perfect fillets it deserves.
Preparing Your Catch Before the First Cut
The difference between a perfect, restaurant-quality fillet and a mushy, off-tasting piece of fish is decided long before your knife ever touches it. Ask any seasoned sportfishing pro, like saltwater legends Ed and Frank Murray, and they'll tell you the same thing. Decades spent competing in high-stakes tournaments from the Florida Keys to Mexico taught them one critical lesson: preparation is everything.
When you're dealing with a prime catch, the work you put in during those first few minutes after it hits the deck determines the final result. This isn't just about keeping things tidy. Every single step, from the moment that fish comes over the rail to the second it lands on your cutting board, is an opportunity to preserve the firm texture and clean flavor you worked so hard for.
From the Water to the Ice: A Tournament-Tested Approach
In the heat of a tournament, there's no room for error. The Murray Brothers perfected a workflow built for speed and quality, and it starts with handling the fish correctly right away.
The first order of business? Bleed the fish immediately. This is non-negotiable for species with dark bloodlines like tuna, wahoo, or mackerel, but honestly, it improves the quality of almost any saltwater catch. Bleeding gets the blood out of the meat, preventing that strong, "fishy" taste nobody wants.
- How to do it: Make a deep, confident cut right through the gills on both sides. Another effective way is to slice the artery just behind the gills, along the fish’s throat latch. You’ll know you’ve hit the mark when you see a steady stream of blood.
- Let it bleed out: The best way is to hang the fish head-down over the side of the boat with a tail rope for a few minutes. You can also place it head-down in a bucket of seawater until the bleeding stops.
Once it's bled, that fish needs to get cold, fast. Tossing it on a pile of dry ice just won't do the job right. You need to create a slurry of ice and saltwater in your cooler. This ice bath chills a fish way faster and more thoroughly than ice alone, dropping its core temperature in a hurry to stop bacteria and firm up the flesh.
"A fish that's been properly bled and iced is halfway to a perfect fillet. You've locked in the quality right there on the boat. It’s the single most important thing you can do before you even think about the cleaning table."
Gutting and Scaling: Setting the Stage for a Clean Job
With your fish perfectly chilled, it's time to head to the cleaning station. The goal here is to be clean and organized to avoid contaminating the meat. One of the most common mistakes people make is accidentally puncturing the stomach or intestines while gutting, which can release some nasty stuff that will ruin a fillet.
To gut the fish cleanly, start by making a shallow cut from the anal vent straight up toward the gills. Be careful not to plunge the knife tip in too deep—you just want to slice through the belly wall. Once it's open, reach in behind the gills and pull the organs out in one smooth motion. Use your thumb or the back of a spoon to scrape the bloodline clean along the backbone, then give the whole cavity a good rinse with cold, fresh water.
So, should you scale it or skin it? That really depends on the fish and how you plan to cook it.
- Scale it if… you're going to pan-sear or grill the fish with the skin on. Think snapper, sea bass, or flounder—species with skin that gets deliciously crispy. Grab a fish scaler and work against the grain, from tail to head.
- Skin it if… the fish has tough, inedible skin (like a big grouper or a triggerfish) or if you're just planning to fry or bake skinless fillets anyway. In that case, don't even bother with scaling; you'll be taking the skin off later.
By following this disciplined routine, one that's been proven time and again in the competitive sportfishing world, you're setting yourself up for success. Your fish will be clean, firm, and ready for the knife, ensuring you're working with the best possible product from the get-go.
Mastering the Murray Filleting Method
After decades spent on the saltwater tournament circuit, Ed and Frank Murray didn't just learn how to fillet a fish—they perfected it. Their method isn't some rigid, by-the-book process. It’s a technique born from thousands of hours on the water, where getting the job done quickly and cleanly is all that matters. It’s about fluid motion, feel, and a real understanding of the fish's anatomy.
Think of it as one continuous flow, from whole fish to perfect, boneless fillets with almost zero waste. This is the final step in honoring a great catch, and doing it right is a skill every serious angler should have in their arsenal.
Before you even think about the main cuts, you need to prep the fish. This initial groundwork is what sets you up for a clean, easy fillet job.
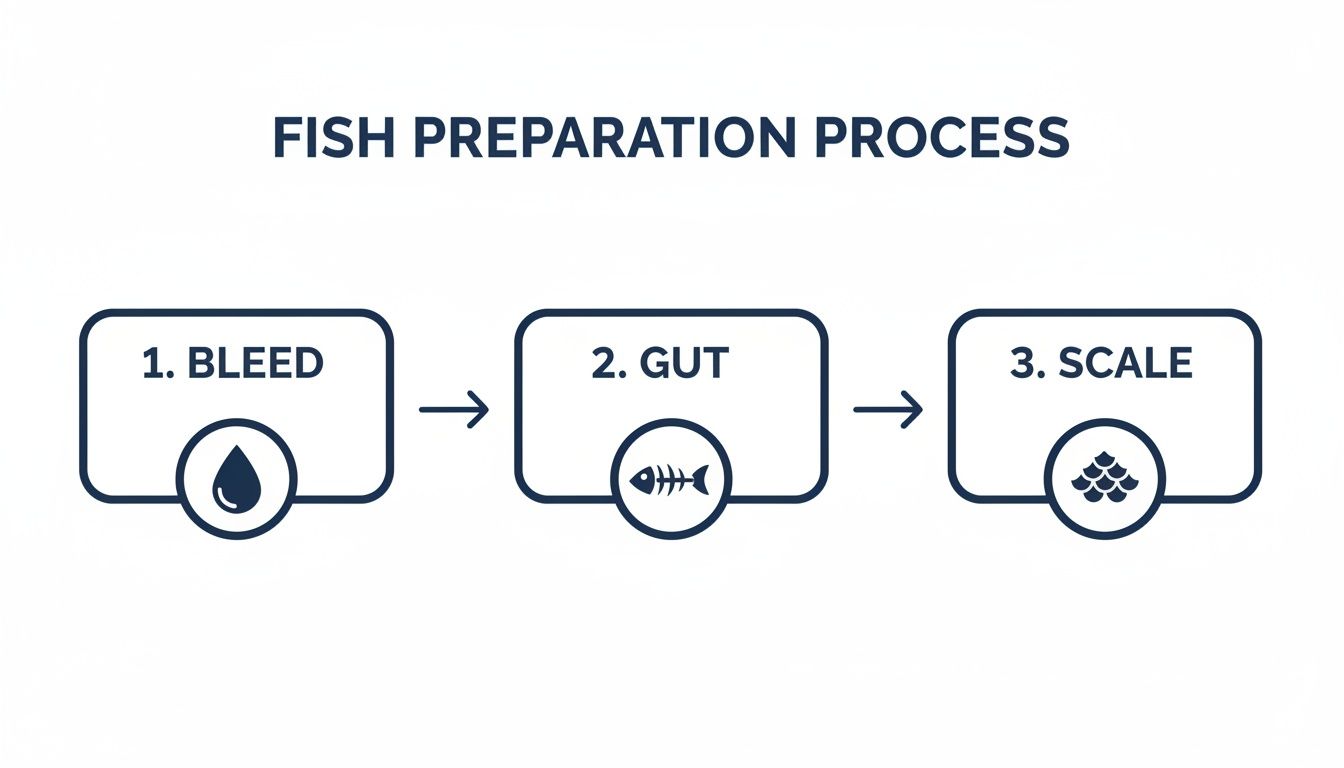
This chart breaks down the essential first phase: bleeding, gutting, and scaling. Get these right, and the rest is a whole lot easier.
The Initial Incision and First Fillet
Alright, let's get to it. Lay your fish on the board with its belly facing away from you. The whole process starts with one clean cut right behind the gill plate.
Angle your blade slightly toward the head. This little detail is a key part of the Murray technique. It’s how you get that sweet, rich meat from the collar that most people end up leaving behind.
Press down firmly until your knife kisses the backbone. You’ll feel it. Don’t force it. From there, turn your blade so it's running parallel to the board, edge facing the tail. Now you're in position to take off that first fillet.
Using long, smooth strokes, let the knife glide right along the backbone. You want to feel the tip just ticking against the bones—that’s your guide. Let the blade do the work.
"Don't saw at the fish. Let the blade glide. You're not cutting through it; you're tracing the bones and separating the meat. It's a dance between your knife and the fish’s anatomy.”
Keep that motion going all the way to the tail. When you get there, stop just before you slice through the skin. Now, you can flip the fillet over, skin-side up. This trick leaves the fillet attached by a small piece of skin, giving you a perfect handle for when it's time to skin it, which we’ll tackle next.
The Second Side and Reading the Fish
Flip the whole fish over and do the exact same thing on the other side. Start with that angled cut behind the gill, turn the blade, and follow the backbone right down to the tail.
Here's where the experience of a sportfishing legend really comes in. Every fish is different. A flat flounder needs a more flexible blade and a lighter touch, while a big, thick-sided grouper requires a stiffer knife and more power behind the cut. You learn to "read" the fish through your knife.
Learning how to fillet a fish the right way means less waste and more meat on the table. It's not just a feeling; culinary studies show that a skilled hand can improve the edible yield from a fish by 20–40% over someone who's just hacking away. For many popular species, you can go from a recovery of just 60% up to an impressive 75–85%. That's a huge difference when you're feeding a family. If you're interested in the numbers, you can find more data on seafood processing efficiency and its impact.
This is the heart of the Murray method. It’s less about memorizing steps and more about developing that instinct. When you're done, the carcass should look clean—almost like a skeleton with hardly any meat left on it. That’s the sign of a job well done.
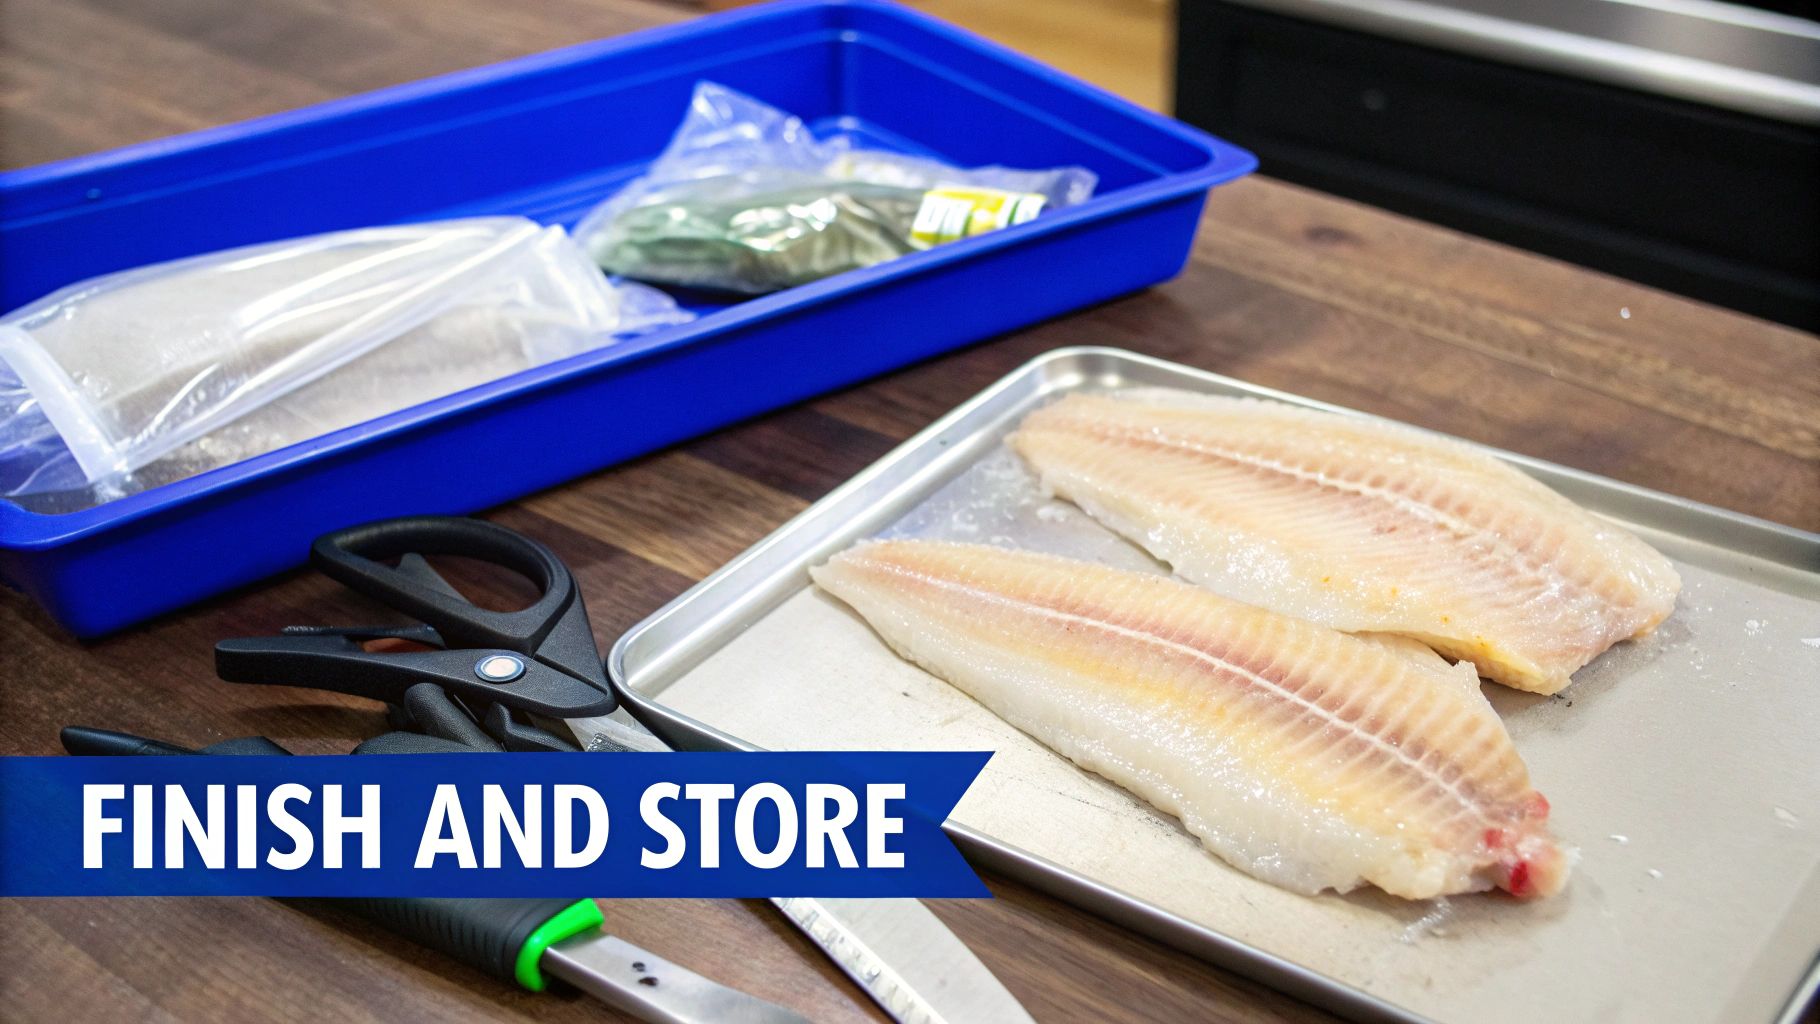
Finishing and Storing Your Fillets
Alright, you've made the perfect cuts and now you’ve got two beautiful fillets sitting on your cutting board. But don't crack a beer just yet—the job isn’t quite done. The final steps are just as critical as the initial cuts. This is what separates a decent piece of fish from a great one, turning your hard-won catch into something truly special.
What you do now—skinning, deboning, and storing—is what transforms those fillets into clean, restaurant-quality portions. It's about trimming away the imperfections and treating the fish with one last act of respect to guarantee every bite is perfect.
From Skin to a Spotless Fillet
Removing the skin takes some finesse, but it's incredibly satisfying once you get the hang of it. If you left the fillet attached at the tail like we talked about earlier, you're already ahead of the game.
Lay the fillet skin-side down, with the tail end pointing toward you. Get a firm grip on that little tab of skin you left. With your fillet knife, make a downward, angled cut through the flesh until you just hit the skin. Now, flatten your blade so it’s almost parallel to the cutting board.
Here’s the trick: hold the skin taut with one hand while gently pushing the knife forward with the other. Use a slight side-to-side sawing motion, but let the tension you're creating on the skin do most of the work. You’re essentially pulling the skin against the blade as you slide the knife down the fillet. Do it right, and you'll be left with a perfectly clean, skinless piece of meat.
The Art of Removing Pin Bones
Even the most expertly cut fillet has a line of pesky pin bones running down its center. Taking a few extra minutes to remove them makes a world of difference when it comes time to eat. Nobody wants to be picking bones out of their teeth at the dinner table.
To find them, just run your fingertips lightly along the midline of the fillet, starting from where the head was and moving toward the tail. You'll feel the tiny, sharp ends of the bones just under the surface.
Once you’ve located them, a good pair of needle-nose pliers is your best friend.
- Get a firm grip: Grab the very tip of the bone.
- Pull with the grain: Angle your pull toward where the head of the fish was. If you pull straight up, you risk tearing the delicate meat.
- Use a smooth, decisive motion: A quick, firm tug is much more effective than a slow, hesitant pull.
Work your way down the fillet until you can't feel any more bones. It's a small step, but it elevates your filleting skills to a professional level.
"A fillet without pin bones is a fillet you can serve to anyone with confidence. It’s that final touch that shows you care about the details, from the hookup to the plate."
Trimming and Preparing for Storage
With the skin and bones gone, give your fillets one last look. This is your chance to trim off any leftover belly fat, the dark bloodline, or any tough membranes. What you're aiming for are uniform, clean-looking pieces of fish.
Next, give them a quick rinse under cold, fresh water. Never use warm water—it can make the meat soft and mushy. Now for the most critical part: pat the fillets completely dry with paper towels. Excess moisture is the enemy of fresh fish; it encourages bacteria and causes nasty ice crystals in the freezer.
This whole process can leave your clothes smelling, well, fishy. If you need some proven ways to get that odor out, you can learn more about how to remove fish smell from clothes in our detailed guide.
Long-Term Storage Done Right
If you aren't cooking the fish tonight, proper storage is non-negotiable for locking in that fresh-caught flavor.
Hands down, the absolute best method is vacuum sealing. It sucks all the air out of the package, preventing oxygen from ruining the fish and stopping freezer burn cold. A vacuum-sealed fillet can last for months in the freezer and taste nearly as good as the day you caught it.
No vacuum sealer? No problem. The water displacement method with a zip-top freezer bag works great. Just place the fillet in the bag, seal it almost completely, and then slowly submerge it in a bowl of water. The pressure from the water will force all the air out. Once the air is gone, seal the bag the rest of the way.
Properly finished and stored, your fillets are ready. This final step in learning how to fillet a fish ensures that the memory of a great day on the water lives on in a delicious meal.
Common Questions About Filleting Fish
Even with the best guide in front of you, questions always pop up once you're standing over the fish. After decades in the saltwater sportfishing world, Ed and Frank Murray have pretty much heard them all. Here are their insights into the things that can make the difference between a frustrating mess and a perfect fillet.
Getting these little details right is what builds real skill and confidence. It's how you turn learning how to fillet a fish from a chore into a satisfying part of the whole experience.
What’s the Biggest Mistake Beginners Make?
Hands down, the single biggest mistake is trying to work with a dull knife. It’s that simple.
A dull blade forces you to use way too much pressure. This crushes the delicate meat, makes messy, jagged cuts, and is a surefire way to have the knife slip and cause a nasty injury. Always, always start with a razor-sharp fillet knife.
Another rookie error is trying to rush it. Filleting is about finesse, not speed. Use smooth, deliberate strokes and let the sharpness of the blade do the work for you.
"A sharp knife is a safe knife. It respects the fish and it respects your hands. More pressure never makes up for a dull edge."
Should I Leave the Skin on My Fillets?
That’s a great question, and the answer really depends on two things: the type of fish and how you plan to cook it. There's no single right answer here, but there are some solid rules of thumb the Murray Brothers have learned over the years.
- Leave it on for fish with thin, delicate skin that crisps up beautifully, like a salmon or a snapper. After you scale it, that skin adds incredible texture when pan-seared and helps keep the fillet from falling apart.
- Take it off for fish with tough, thick, or strong-tasting skin. Think grouper or tuna. For these, you'll almost always get a better result by removing the skin before cooking.
How Can I Tell if I Wasted Meat?
Once you’ve taken both fillets off, the fish's skeleton becomes your report card. Take a good look at it.
A well-filleted fish leaves behind a clean frame. You should practically be able to see through the rib cage, with very little red meat left clinging to the bones. Run your finger along the backbone and ribs—if you feel thick chunks of flesh, you know you need to keep your blade a little tighter to the bone on your next go.
But don't you dare throw that carcass away! You can easily scrape off any of that leftover meat with a spoon. It's fantastic for making fish cakes, hearty chowders, or a rich fish stock. It's the best way to make sure absolutely nothing from your prized catch goes to waste.
For gear that’s as legendary as your fishing stories, check out the full collection of apparel and accessories from Murray Brothers Palm Beach. Built on a legacy of sportfishing excellence, our products are designed to perform on and off the water. Shop now at https://www.murraybrosretro.com.
Dejar un comentario